How to Make a Directional Sign
So what do you do when you have the travel bug and don’t have time to take a big road trip? Amazing destinations are calling your name and you just don’t have time or resources to hit the road. That’s when you get creative and make a directional sign to remind you of all the amazing places you want to visit as soon as life settles down!
This post includes affiliate links.

How to Make a Directional Sign
I love finding directional signs when we are out on an adventure. No matter where I travel, my family and friends love to help me find these fun photos! I decided it was the perfect time to make my own directional sign for my backyard.


Materials Needed:
- Old Pallet for arrows
- Saw
- Post (4×4 from my barn)
- Acrylic Paint
- Cricut and iron on adhesive (for stencils)
- Paintbrush (or sponges)
- Drill
- Screws
- Post Hole Digger – optional
Make Your Signs
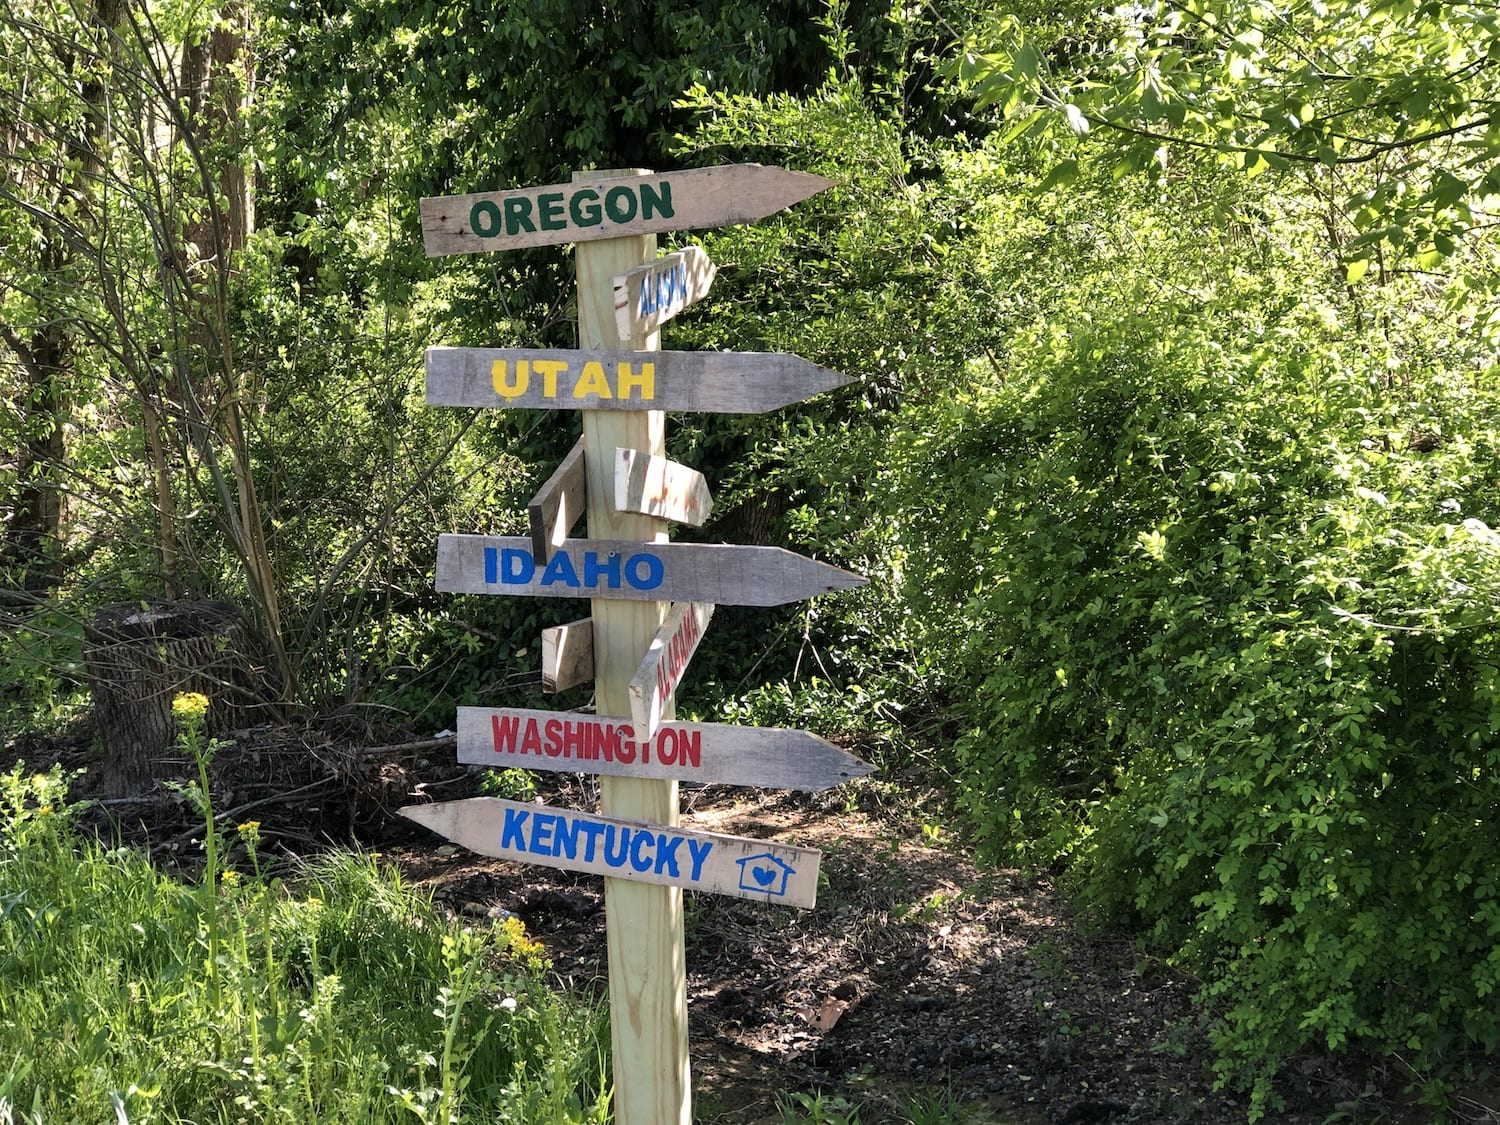
I don’t like to spend money on easy projects, so I got creative and used what I have here at home. I rummaged through the barn and found an old pallet and had my husband cut it into similar shape arrows.


Pick Your Place/Names
This is arguably the most fun part of the project. Which names do you want to use?
- Do you choose places you love and have a connection to already?
- Do you pick destinations you’ve never visited and want to explore?
- Do you use the cities where your family live?
There’s no right or wrong choice!
Print & Paint Your Destinations
I used my Cricut to create stencils to make this process easier then used a blocky font and cut out some heat transfer vinyl destination names. Weed out the cut pieces so you have a full piece to paint as a stencil. Paint each destination a different color using a sponge brush.

I discovered that it is best to cut each state name individually from your Cricut. If you do them all at the same time you won’t have enough margin to be able to cut the various names. Once you paint over the stencil, gently remove it and you will see your finished letters.

Assemble the Sign
Once you have all the arrows painted, it’s time to assemble the sign.
Since I was using a 4×4 from the barn, I used the post-hole digger to make my hole. Depending on what size post you use, you may be able to just hammer it into the ground.

Arrange your arrows on the ground so you know which direction you want to add them to your pole. *I chose to not add the mileage to each state but feel free to add miles if you want!

I found that it worked easiest to drill a pilot hole before I screwed the arrows into the post.

Once the arrows are attached, you are ready to enjoy dreaming of all your next travel adventures!
Where will you travel next? Will you take a road trip across the county, state or all the way “out west”? I can’t wait to hop in the truck and go explore somewhere new, but till then, I’ll just enjoy my new directional sign in my backyard!
Celebrate Travel When You Can’t Leave Home
Check out other ideas to help celebrate your love for travel!